
Over the last couple of years, I’ve had the pleasure of giving over 50 people their first dose of Virtual Reality. Starting with the Oculus Development Kit 2 (DK2) and now the Oculus Rift , it’s always been an exciting experience. After doing so many of these demos and introductions, it made me think about having some way to capture the moment where the user forgets they’re in a headset and starts letting loose!
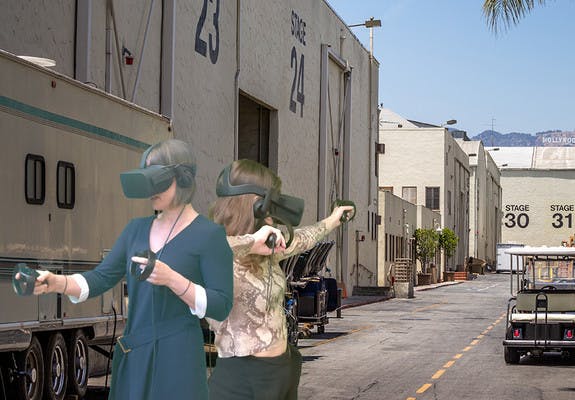
Earlier this year we had a little “VR party” at Blend Media which was a fantastic opportunity for me to hone in on my GIF-making skills. It was a great occasion in which everyone tried out some different VR games; naturally I took a video camera with me (and a green screen). The results were spectacular.
The above is Lee Owen‘s (VP of Licensing) reaction in his first five seconds of Robo Recall; the headset had only just been placed onto his head. Footage from that point continued to provide excellent examples of people just letting loose in the incredible world of VR. In the end I was able to get a few short clips of a few of us doing some…interesting things.
Usage in Slack
At Blend Media we use Slack a lot for almost every type of discussion. Naturally it was the perfect platform to put some funny clips of ourselves in VR, and it just so happened that Slack has a fantastic custom emoji feature. So I got to work on making those short video clips into tiny little gifs and eventually the library grew to include more and more of us.
Today, I’d like to share my current process of capturing and making these GIFs, and hopefully inspire people to make their own digital souvenirs to remember their VR experiences with.
Virtual Office Space
When setting up a space for VR experiences, I am of the opinion that bigger is better. A larger space enables people to free up their movements and be a little more natural in their reactions – which always leads to better footage.
However, a larger space adds more challenges as you’ll need a bigger green screen and in the case of the Oculus Rift, you’ll most likely need USB extensions and probably a third sensor. The HTC Vive is better suited for larger spaces, however it does have it’s own set of considerations such as sensor mounting and power cables. We’re not here to argue VR device choice however, everyone is free to use whatever they want 😁.
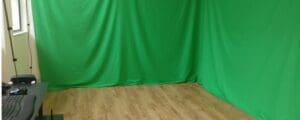
We currently sport a VR space of about 8ft x 10ft (2.4m x 3m), it’s not a massive space, but it’s definitely not a small one either.
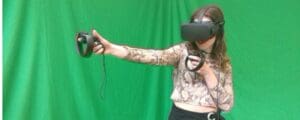
Making it green
If you want to make GIFs, you need a green screen; without the transparency it’s just not as fun! It doesn’t need to be super high quality and you don’t need a super professional installation either for the kind of output we want. We don’t employ any special lighting, in fact we have pretty poor lighting in all honesty – but we still seem to get good results. But if you want to get some proper photography lighting, go for it!
You’ll also want to try and cover a large vertical area and at least two walls of your space. This allows for more options in terms of recording angle, as well as accommodating everyone’s height.
I wouldn’t really recommend having your green screen on the floor as well, as it could be a pretty big tripping hazard as your subject is essentially blindfolded during their VR experience, and until we get tracked feet in VR, there’s not much interesting going on there anyway.
To cover two of the walls in our office, I ended up purchasing this screen on Amazon.
Recording The Experience
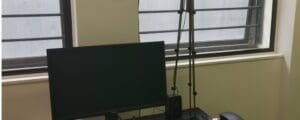
To record the VR session, I just use a USB webcam. The final output of a Slack GIF has to be under 128×128 pixels and 64KB, so we’re not going to gain anything by using an expensive SLR camera.
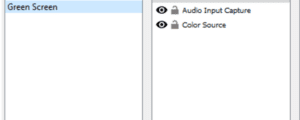
Whilst we can directly record the footage of the camera using any capturing tool on the PC (plus apps included with Windows) I opted to use OBS (Open Broadcaster Software) instead. OBS is very popular in the gaming crowd especially live streaming and has some pretty powerful features that help out in recording.
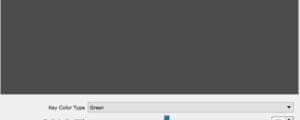
The main thing I use OBS for is for pre-filtering out the green screen during recording and applying a solid green colour (#00FF00) to the background. I have found that OBS is a little easier to set up, especially when you have a messy green screen, than more professional software such as After Effects. An added bonus is that I can re-use the same recording session for mixed reality capture. Using OBS to filter out the screen does make it near impossible to tweak the settings of the filtering, such as when someone walks on with a green-ish shirt, however it does seem to work 90% of the time.

A note on Mixed Reality
Whilst we’re not really talking about mixed reality capture in this article, I am extremely interested in it. There has been some really cool research in the field, and I’m definitely excited to play around more with it.
In the initial recording attempts I’ve tried out with it, you definitely look cool!
Processing The Footage
This next part is probably the hardest task, but fortunately is also the most satisfying: Looking through all the footage you’ve filmed and finding that perfect clip to turn into a GIF.
We’re generally under a lot of constraints in finding something appropriate. Due to the file size restrictions I mentioned earlier, I would recommend finding something that lasts about a second, two at a push. Any longer and you’ll be making a lot of compromises later to hit that 64KB file limit. Additionally, you want find something that has very expressive body language or overall physical activity, due to the size Slack renders our emojis. Despite a 128×128 original size, it’s near impossible to detect facial expressions.
I’ve had footage that lasts about three hours before (VR parties yield a lot of it). My usual process is to open up the raw video in VLC, set the playback speed to around 150-200%, and sit back and relax with a beer, waiting for a great moment to present itself.
Sometimes I get a little lucky, and I’ll spot what I want to make into a GIF when it actually happens. The real problem from there is trying to find the exact time in the video when it happened.
Clipping
Once you’ve found a short segment of video, you need to snip it. Whilst I use Adobe After Effects for processing the green screen transparency, it’s not great at splitting up clips (or reversing/speeding up), so I usually import my footage into Adobe Premiere. There’s a fair number of simple video clipping tools out there, including iMovie that comes with Mac OS, so you don’t really need to use anything complex to achieve this part.
It’s at this point you want to really think about the length of your clip that you want to convert into a GIF. About one second is pretty good, but you could potentially get up to 1.5/2 seconds at a push, but you will be sacrificing the final image quality for that additional duration. Additionally, if you want the GIF to seamlessly loop you’ll most likely end up duplicating the clip and playing it in reverse for the second half, meaning you now have even less time to work with, or you’ll be required to speed up the footage.
In the example clip above I decided to snip out the short section of movement with the hands just before the punch, and reverse it. You can see a short video clip below on how to quickly snip, duplicate, and reverse the sequence below.
https://youtu.be/sORXAt_YrFw
Once the video is clipped, it can be exported ready for green screen processing. We don’t want to continually re-encode the video for compression as we’ll be doing that at the final step for the GIF output, so I recommend setting everything to maximum or “raw” in your export settings (you can also disable audio output as it won’t be needed). As the clip is only around a second in length, rendering should take no time at all.
Note: If your footage is above 30 frames per second, I recommend outputting at 30 maximum, as Slack on mobile devices does not seem to be able to play 60FPS GIFs at full speed, resulting in a very slow looking image.
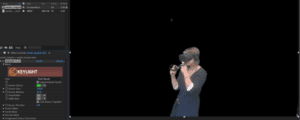
Applying the green screen chroma key
Once the clips have been cut and exported, we need to get rid of the green screen from the background. The quickest and easiest way I’ve found to do this is using After Effects. In the past I’ve struggled with their green screen filter (keylight) as it tends to require a lot of adjustment for a low budget setup (no lighting/folds in screen). However, since we processed the screen in OBS first, then applied a solid green colour, it’s much quicker and easier to apply. Simply create a new composition from your clip, then add the keylight filter (⌥+⇧+⌘+E). From there you can select the pure green colour from the video background as the screen colour to get transparency added quickly.
As with all the steps so far, we’re not really concerned with great quality here. If there are small bits of slightly transparent background, or slighted faded out foreground elements, the export to GIF will fix this as it only supports a 1 or 0 value for opacity. Any additional artefacts outside the subject will also be cropped out in Photoshop in the next and final step.
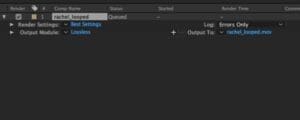
To allow photoshop to output our GIF with transparency we need to export the video file from After Effects, ensuring that we include the alpha channel. Start by exporting the file and adding to After Effects render queue (we won’t be using Adobe Media Encoder for this), then click on the quality setting of the new item (mine defaults to Lossless) and update the settings to include the alpha channel.


Exporting as a GIF
The final step in processing your video clip is taking the file you’ve exported (After Effects will usually create a .mov file) and opening it in Photoshop. It should be able to see the alpha channel in the video and render the transparent checkerboard you’re used to. Photoshop also supports animation, and you can play/preview the clip at any time by pressing the spacebar.
The first thing you’ll want to do is crop the image so only the subject of the clip is in frame, taking care to keep them in frame throughout the entire motion. I also recommend cropping the image so that it is perfectly square – whilst Slack supports GIFs in all aspect ratios, when viewed on mobile (at least on Android) it is stretched to be square. Once cropped, resize the image to a maximum of 128×128 pixels. You shouldn’t need to worry too much about what resample setting to choose, as the GIF export will most likely sharpen a lot of edges anyway.
Once resized, you’re ready to export. We’ll use the legacy save for web dialogue for this, as the new export dialogue does not seem to output animation when selecting GIF output. Open the save dialogue, and choose GIF as the target output, you’ll then need to play around with the settings, most of all the colour option, reducing the number until you can get your target output under 64KB. If you can’t seem to get the image under 64KB, exit out of the save dialogue and shrink the image a little more, I usually end up at 100×100 or 80×80 in final output, with around 48-32 colours. One thing to note is that whilst Photoshop may say the output is 63KB, Slack usually rejects this, so I recommend that you aim for about 60-62KB maximum. You can see a quick video below of the entire process.
https://youtu.be/nSyuyn5WaVo
Importing Into Slack
Once you have your GIF file, the only thing left to do is import it into Slack. You can do this by going to http://
And that’s it, you’re done! Sit back and bask in the excellent GIF you’ve created!
Hopefully this guide has been helpful, and if not at the very least entertaining. Thanks for reading.
